
Abook: A Tutorial
Abook is a fantastic bit of software, a delightfully concise answer the problem, “How do I manage my contact information?” It's small and fast; it deals with all types of contact information, including types its original authors didn't anticipate would be needed; its data is stored in the universal format (text); and it plays well with other programs. Unix at its finest.
But (you knew there'd be one!) the documentation is marginal, almost nonexistent. It's easy to find information on how to integrate abook with mutt, and the interactive interface is quite well designed and mostly self-explanatory. But what if you want to define new fields? Change the way the information is presented in the interactive view? Change the program's behavior in small ways? It's hard to find information on this.
So here's an attempt to help mitigate that problem. As a beginning effort, please open abook and hit "?"; this will tell you pretty much all you need to know about the interactive program. Then read the abook man page and the abookrc man page. Sparse as they are, they appear to be the only official documentation there is. We'll assume that you've at least perused these documents in this tutorial, though we'll be repeating a lot of that information in an effort to condense documentation into one location.
Basic Abook Use
Basic abook use is as easy as a program can be. To start abook up for the first time, with default settings and an empty address book, just run $> abook, and you'll get the following:
(The blue line at the bottom is my personal setup; it's not part of abook, and you probably won't see it unless your setup is very similar to mine.) The most common commands are up top; so to add an address, hit "a", and you'll be prompted for a name at the bottom of the screen. Type in the name and hit "enter".
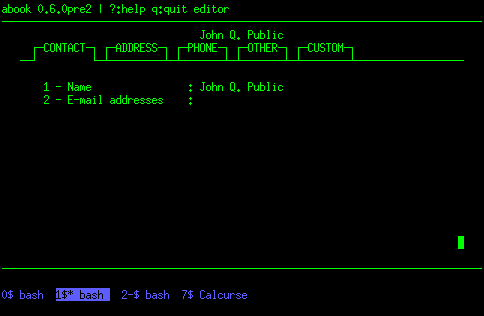
As you can see, you've got two fields visible, "Name" and "E-mail addresses", numbered respectively 1 and 2. You can change any field, even the name, at any time, as abook keeps track of entries internally by arbitrary number. To change the name, hit "1", and then follow the prompts at the bottom:

Now add an email address by hitting "2"; make it homerdquick@example.com. That takes care of the "CONTACT" view.
View? Abook terms those tab-looking things---the ones labelled "CONTACT", "ADDRESS", "PHONE", and so on---"views". They can be customized with great precision, as well, but for now we'll stick with the default.
You can move back and forth between views with either the right- and left-arrow keys, or with the "h" and "l" keys. Flip between them for a few minutes, then go to "ADDRESS":
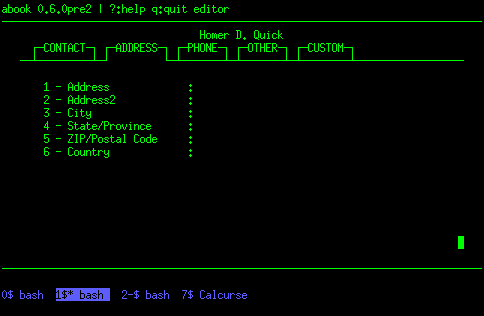
Notice that each field here is numbered, as well. Add or change information in any field just by hitting its number. Add a few entries until you feel comfortable with this.
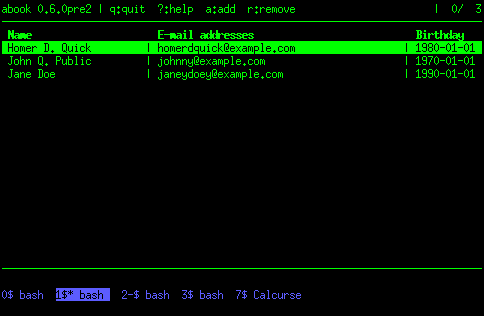
After you've done that, hit "q". This will take you to a listing, which contains only your entry for Homer D. Quick. (Don't worry; this screen is also very customizable. But we'll stick with the default for now.) Add a few more people to this, with as much or as little information as you'd like; hit "q" to get back to your listing. After a while, your listing page should look something like this:
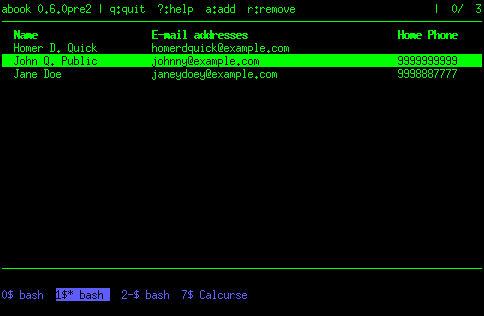
You can move up and down in your listings by using the up or down arrow keys, or by using "j" and "k".
To get a listing of other commands, hit "?". You'll get a very complete summary of internal abook commands, including "i" to import contact information (abook can read in a variety of different formats) and "e" to export contact information to a different format (again, abook can export to many different formats; the man page will tell you exactly which). By hitting "m", you can even call mutt and write a mail to that person within abook!
Before you quit, hit "w". This will write what you've been working on to the disk, so that these very important contacts are saved. We will see how to make abook save these automatically upon quitting later; for now, though, if you quit without writing, you'll lose your work.
By now, you're familiar with most of what you're likely to be doing with abook interactively. Now, let's consider how to customize abook's behavior.
Customizing Behavior: abookrc
In your home directory, run the following:
$> cd .abook
$> ls
abookrc   addressbook   addressbook~
That abookrc file is the one we're going to be worried about for now. It's full of options to help you control abook's behavior and appearance, and we'll go through a few of them here.
Variables in abookrc
To start off with, there are a number of variables which broadly control abook's behavior. Variables are defined very simply: the word "set", the variable name, an equals sign, the value. A paradigmatic example:
set autosave=true
autosave is the variable, true is the value, and = is the link between them.
| abookrc Variables | |
|---|---|
| autosave | Save automatically upon quit; as if, rather than just hitting "q", you hit "w" and then "q" when quitting |
| preserve_fields | Abook tries to throw away garbage in your address book, so if it doesn't recognize field names, it will delete them. You will likely have custom fields, so this should be set to "all". |
| index_format | Tells abook how to display your contacts in your main listing. For example, {name:24} tells abook to show the value of the "name" field up to 24 characters. If you put multiple fields within curly braces separated by a pipe ("|"), abook will use the first of those fields which is not empty. Default is {name:22} {email:40} {phone:12|workphone|mobile}; this will display 22 characters of the name, 40 of the email address(es), and 12 of the phone number, if there is one; otherwise, the workphone, if there is one; otherwise, the mobile. Characters outside of curly braces are literal; so if you say {name:22} | {email:30}, the result will have a space, a pipe, and a space between the name and the email. Finally, if the number is negative, the width will be the same, but the field will be displayed right-aligned. |
| show_all_emails | Set this to true if you want all the email addresses for a contact to be displayed in the listing view, false if you want just the first to be displayed. |
| mutt_return_all_emails | Set to true if you want a mutt query to return all matching emails, false if you don't. I can't see any reason not to set this to true. |
| print_command | Gives the command which abook uses when you hit "p" to print the address book. Default is lpr. |
| www_command | Some contacts will have a URL associated with them; this command tells abook what command to use when you're opening that URL, which you do by hitting "v". Default is lynx. You may want to set this to instead use uzbl, or some other browser. |
| address_style | Default address style when exporting as text or printing the address book. Possible values are us, uk, or eu. Set this to whatever is applicable to your location and preference. |
| use_ascii_only | Normally, abook uses UTF-8 characters; this option permits you to force it to use only ASCII characters. Defaults to false, because pretty much all terminals these days allow non-ASCII characters. |
| add_email_prevent_duplicates | If set to true, abook will prevent duplicate addresses being added to the database. Default is false. |
| sort_field | Set this to the field you want abook to sort your contacts by when you're viewing them. Just use the name of the field. This works even for custom fields. |
| show_cursor | Set to true if you want the cursor to be visible in the main display, false if not. I can't see any reason not to set this to false. |
Once you have your variables set up, you can start defining custom fields and views. These may change how a few of your variables will end up being set (especially index_format and sort_field).
Custom Fields and Views
Defining custom fields is extremely easy, and is done in the abookrc file, along with all your other variables. The format is pretty simple. Let's take a common example:
field birthday = Birthday, date
We begin with the field keyword, letting abook know that it's about to learn about a new field. Then we follow by the name of the field, in this case birthday; this is the name that abook knows the field by, and it's what you'll use in your variable values, like index_format. Then, put in the =, then follow it by the name abook will give your field in listings. Here, that is Birthday; this is how the field name will appear in the listings page and in the individual contact entries. Finally, you put in a comma (,), then the type of the field. The type can be any one of the following: string, email, list, or date. When in doubt, use string; it's the default, and it will serve well for generic data.
Now that you have a new field, abook will at least know what you're talking about, and even display it in your listing, if you tell it to. But it won't display it in your individual contact pages unless you put it into a view. Views, remember, are those tabs at the top of the contact pages:
The views are "CONTACT", "ADDRESS", "PHONE", "OTHER", and "CUSTOM". They are defined, by default, as follows:
view CONTACT = name,email
view ADDRESS = address,address2,city,state,zip,country
view PHONE = phone,workphone,fax,mobile
view OTHER = nick,url,notes
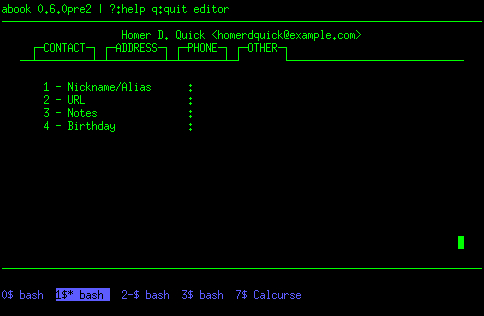
(Leaving out "CUSTOM", since it's used for obsolete categories.) By now, you probably already know how this will work, but we'll explain it anyway, just to be sure. Change the last line, OTHER, to be the following:
view OTHER = nick,url,notes,birthday
Then restart abook and go to one of your contacts. Now you'll see your own custom field, "Birthday", within the OTHER view:
Hot dog! Fill in some birthdays, and then we'll do some real work.
So now you've got some real power at your fingertips. Let's say birthdays are very important to you for some reason, and you want to make sure that you can quickly scan the birthdays of all your contacts. Well, reset your index_format to be the following:
index_format = {name:22} | {email:40} | {birthday:-10}
Then restart abook and marvel at your new listing:
And now you know enough to make all the contact customizations you want.
A Sample Abookrc
To provide an example of how thoroughly these things can be customized, I'm providing my own personal customization here. First, the whole of the file, all at once; then a screenshot showing how it looks.
Sample abookrc:
# define some fields for use later
field birthday = Birthday, date
field name_last = "Last Name", string
field name_first = "First Name", string
field name_middle = "Mid.", string
field email_lists = "Email Lists", string

# sort by last name
set sort_field=name_last

# define views for the tabs
view CONTACT = name,name_last,name_first,name_middle,email,phone,mobile,workphone
view ADDRESS = name,address,city,state,zip,country
view PHONE = name,phone,mobile,workphone,fax
view OTHER = name,nick,birthday,url,email_lists

# set some variables
set autosave=true
set preserve_fields=all
set show_all_emails=true
set index_format="{name_last:12} {name_first:12} {name_middle:1} | {email:31} | {mobile:-14|phone|workphone}"
set mutt_command=mutt
set mutt_return_all_emails=true
set print_command=lpr
set www_command=w3m
set address_style=us
set use_ascii_only=false
set add_email_prevent_duplicates=false
set show_cursor=false
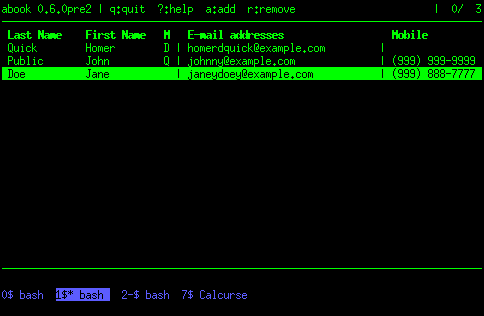
The listing page:
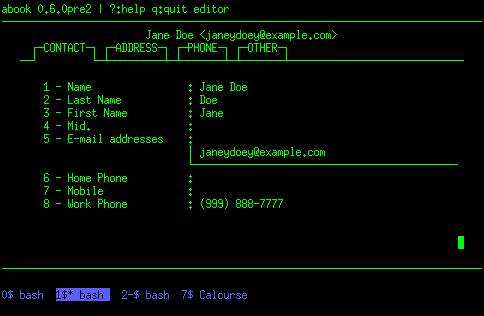
One view from one contact:
Conclusion
Abook is an incredibly powerful tool for managing contacts, and now you know how to make it incredibly customized, as well. I use abook for all of my contacts, email and otherwise; and I hope this tutorial will help others make better use of it, as well.